Flutter
2023 年 3 月 11 日
Flutter 项目组件解释
前情提要
初次使用 Flutter 页面布局或者其他问题,多多少少可能都会有一点。如遇到并解决,会及时更新。
我经常去的几个网站330 多个组件使用介绍、Flutter 入门介绍学习。这两个网站我个人感觉,前者偏向组件使用和语法介绍,而后者更适合新手来学习比较重要的概念。组件并不是很全。建议配合“食用”。
建议:我下文提到的任何组件 API 都可以通过以上两个网站去寻找学习!!!!!!!!官网个人觉得新人看起来稍有不妥,特别是我这种英语很垃圾的人,机翻根本看不懂。
先看蓝湖设计图
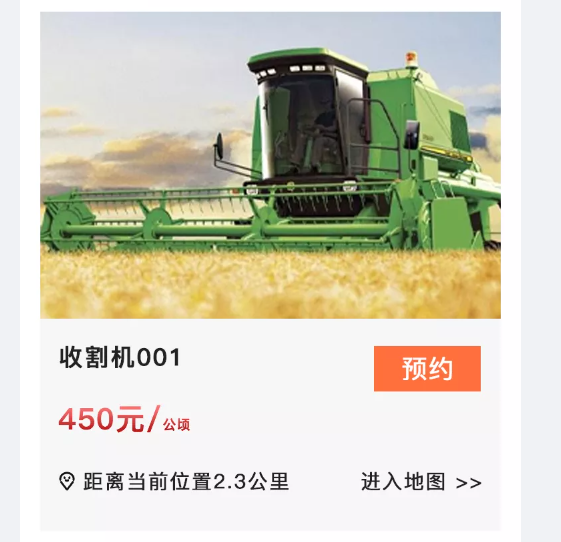
cars组件
下面是我初次分解的结构。
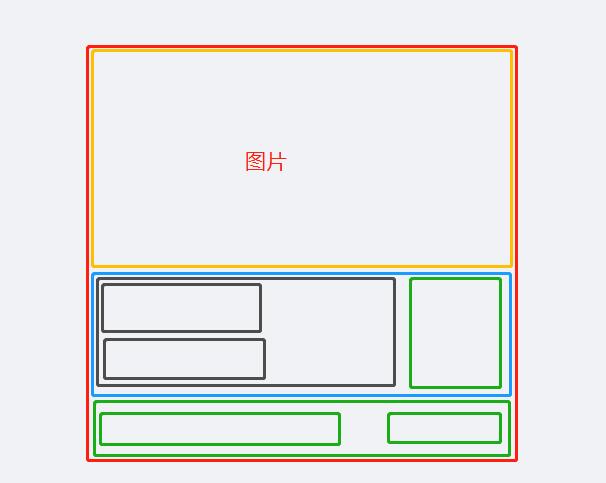
cars组件
我觉得前期页面结构基础不想好,画的时候会出现很多很多问题,有一些样式结构不生效,那么很有可能是你的页面结构有问题!亲身经历,改一下结构样式全生效了。
如果绘画页面有出现黑黄警告条纹的时候,那么代表你的像素溢出了。它不像 HTML,溢出了也很难发觉。而 Flutter 会警告你,这个时候你只需要打开 Android Studio 的 Flutter DevTools 功能。查看你的结构问题。基本改改高宽就能解决。再不济结构改变下。
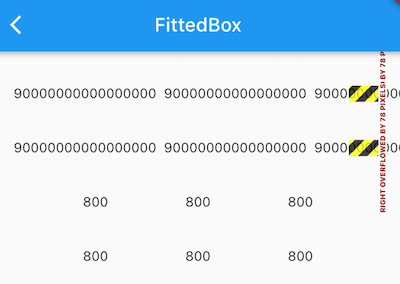
像素溢出错误
全部代码
    return Container(
      decoration: BoxDecoration(
        color: Color(0xfff2f2f2),
      ),
      width: 345.w,
      // height: 389.h,
      child: Column(
        children: [
          Image.network(
            "http://yz-shigongli.oss-accelerate.aliyuncs.com/2022-03/1648094119154-7b280bbf63105a8e90299e2d79c8c6ee.jpeg",
            width: 345.w,
            height: 230.h,
            fit: BoxFit.cover,
          ),
          Container(
            padding: EdgeInsets.fromLTRB(15, 20, 0, 0),
            child: Row(
              crossAxisAlignment: CrossAxisAlignment.start,
              verticalDirection: VerticalDirection.up,
              children: <Widget>[
                Container(
                  child: Text(
                    item.name,
                    style: TextStyle(fontSize: 18, fontWeight: FontWeight.bold),
                  ),
                ),
              ],
            ),
          ),
          Container(
            padding: const EdgeInsets.fromLTRB(19, 0, 0, 0),
            child: Row(
              crossAxisAlignment: CrossAxisAlignment.start,
              verticalDirection: VerticalDirection.up,
              mainAxisAlignment: MainAxisAlignment.spaceBetween,
              children: <Widget>[
                Container(
                  child: RichText(
                    text: const TextSpan(children: <InlineSpan>[
                      TextSpan(
                          text: '8555元/',
                          style: TextStyle(
                              color: Color(0xffce3800),
                              fontSize: 22,
                              fontWeight: FontWeight.bold)),
                      TextSpan(
                          text: '公顷',
                          style: TextStyle(
                              color: Color(0xffce3800),
                              fontSize: 10,
                              fontWeight: FontWeight.bold)),
                    ]),
                  ),
                ),
                Align(
                  widthFactor: 1.2,
                  heightFactor: 1.2,
                  alignment: Alignment(1.2, -5),
                  child: Container(
                    margin: EdgeInsets.only(right: 13),
                    width: 86.w, //+6
                    height: 44.h, //+10
                    child: ElevatedButton(
                      onPressed: () {
                        print('点我去预约${item.name}');
                      },
                      child: const Text(
                        "预约",
                        style: TextStyle(
                            fontSize: 19,
                            color: Colors.white,
                            fontWeight: FontWeight.bold),
                      ),
                      style: ButtonStyle(
                        backgroundColor:
                            MaterialStateProperty.all(const Color(0xFFFF703B)),
                        shape: MaterialStateProperty.all(
                            const RoundedRectangleBorder(
                                //这个0像素圆角style如果删掉的话,按钮会变成默认样式,自带圆角
                                borderRadius:
                                    BorderRadius.all(Radius.circular(0)))),
                      ),
                    ),
                  ),
                ),
              ],
            ),
          ),
// 地址信息 进入地图
          Container(
              padding: EdgeInsets.fromLTRB(19, 20, 0, 10),
              child: Row(
                children: [
                  Image.asset(
                    "images/gpsImgae.png",
                    width: 11.w,
                    height: 13.h,
                    fit: BoxFit.cover,
                  ),
                  Container(
                      padding: EdgeInsets.fromLTRB(5, 0, 0, 0),
                      width: 300.w,
                      child: Row(
                        mainAxisAlignment: MainAxisAlignment.spaceBetween,
                        children: [
                          Text(
                            '距离当前位置2.6公里',
                            style: TextStyle(
                                fontSize: 15, fontWeight: FontWeight.bold),
                          ),
                          GestureDetector(
                            child: Text(
                              '进入地图 >>',
                              style: TextStyle(
                                  fontSize: 15, fontWeight: FontWeight.bold),
                            ),
                            onTap: () {
                              print('进入地图');
                            },
                          )
                        ],
                      )),
                ],
              )),
        ],
      ),
    );
整体布局解释
这里面的结构布局还是有点乱的。基本就是使用 Container 包裹一个 Column 或者 Row,以我新手理解。垂直多元素布局使用 Column。想有 CSS 里面那种 Flex 布局的话使用 Row 就足够了。Flutter 里面也有 Flex 组件,但我用的少,感觉上面两个就够用了。下面是官方介绍。
Row
Row可以沿水平方向排列其子 Widget。Column
Column可以在垂直方向排列其子组件。参数和Row一样,不同的是布局方向为垂直,主轴纵轴正好相反。Container
感觉
Container像是一个万能组件,什么都可以。这边我说一下他指定边框线条的样式写法。(百度了好多才找到!其他都是写四条边框的。而我需要的是单独一条边框。)代码
//首先定义一个Container 然后给他加上decoration (修饰器属性)

Container(
  decoration: const BoxDecoration(
      border: Border(
        //同理,需要上边框就写top
          bottom:
              BorderSide(width: 0.5, color: Color(0x20000000)
                  ))),

  child:<省略>
)
预约按钮
预约按钮这边也是费劲了心思,一开始我选择用
padding,发现会撑起其他元素,后来又选择用margin,还是一样的问题,会顶起其他元素。苦思冥想,选择使用Stack和Positioned组件,奈何我页面布局写的太拉。Positioned总是出问题,有时候还没效果。最后!我选择了使用Align,因为他正好适合我这种只想简单的调整一个子元素在父元素中的位置, Align(
widthFactor: 2,
heightFactor: 2,
alignment: Alignment(2,0.0),
child: FlutterLogo(
size: 60,
),
)Alignment他有两个属性 x、y,分别表示在水平和垂直方向的偏移。!> 注意:
widthFactor,heightFactor 这两个参数一定要大于 1.0 哪怕 1.1 也好,因为Alignment是要和他们俩相乘的(Alignment.xchildWidth/2+childWidth/2, Alignment.ychildHeight/2+childHeight/2) 这是他的公式。进入地图文字点击
这个布局很简单了就,我上面提到
Row他能支持多种布局。详情请移步至官网 API。我这里用到的是crossAxisAlignment: CrossAxisAlignment.start, 就是两个元素,一左一右布局。Text 文本点击我用的是GestureDetector 组件。它是手势识别的组件,可以识别点击、双击、长按事件、拖动、缩放等手势。这里我用到了点击。 GestureDetector(
child: Text(
'进入地图 >>',
style: TextStyle(
fontSize: 15, fontWeight: FontWeight.bold),
),
onTap: () {
print('进入地图');
},
)
End
版权声明:自由转载-非商用-非衍生-保持署名(创意共享3.0许可证)
作者: 吃个甘蔗嚼一年 发表日期:2023 年 3 月 11 日